21 Feb Drying in the Roof and Important Details
After a few calls recently on this, I thought I would ponder the subject. Why is drying in the roof important? Well, think about leaving your convertible out in the rain with the top down – you sure wouldn’t do that and it’s a great comparison. The interior of that car would end up with water damage that would have easily been preventable. The same is true for a house or structure that is in the middle of installation and doesn’t have a temporary roof. Drying in is a preventative measure that will keep the structure’s interior sealed and protected.
The roof is one of the most important elements on a house and one of the most abused (sunlight, rain, snow, debris & wind), and also, one of the most neglected items – well that is until you get a leak. While installing roofing is not rocket science, if it is done improperly, it will not last long at all. On a standard roof, you have three primary layers that help protect your house: the sheathing, the underlayment, and then the visible roofing material of choice.
So, what does it mean for a house to be dried in?
“Dry-In” means that the building shell has been completed sufficiently to keep out wind, rain, or the weather in general, assuring that weather-sensitive materials or work can begin indoors without those materials suffering weather damage by rain, wind, snow, etc. In short, drying in a structure means that the roof has been protected with at least a layer of felt, a product like Tyvek Housewrap has been installed, along with all the windows and doors.

Contrary to popular belief:
- This is actually one of the most important phases of construction.
- You do not have to have your siding installed before it is considered “dried in”
- You do not have to have your roofing installed before it is considered “dried in”
- Also, I would not recommend perforated plastic house-wraps, they are just NOT as good as a real Housewrap.
Roof Dry-In Inspections. Once the underlayment is complete and the roof flashings are installed, the roofer will call for the dry-in inspection.
Then you move on to Sheathing.
So, What Is Roof Sheathing and What does it Do?
Roof sheathing, also known as roof decking, is a strong layer of wood boards that are fixed to your roof’s joists and trusses. Your roofer will attach your shingles to these squares or planks of wood. The primary function of roof sheathing is to strengthen your roof. It offers a sturdy support system to build the rest of your roof system on. That said, it has a few additional benefits:
- Sheathing helps stop leaks. A long time ago, when people were first building asphalt shingle roofs, roof sheathing wasn’t always used. What most homeowners found was that without sheathing, their roofs were much more likely to leak.
- Adds Strength and Support to Your Roof – The sheathing not only helps support the roofing materials, but any snow, ice, or branches that happen to be on it.
- Fire Protection – Roof sheathing or decking can also help prevent fires. While nothing is 100% fireproof, many roof sheathing materials come with a fire retardant treatment that can help resist fires on the roof or in the attic.
Next We Talk About the Underlayment
Roofing underlayment is what lies between the shingles and the roof sheathing, or roof deck, which is typically either plywood or OSB. It’s installed directly on the roof deck and provides a secondary layer of protection from the elements, including rain, snow, and wind.
There are three basic types of underlayment used beneath roofing materials:
- asphalt-saturated felt;
- rubberized asphalt;
- non-bitumen synthetic.
Whether or not underlayment is required, it’s always a good idea because it provides the roof deck an extra layer of defense against damage.
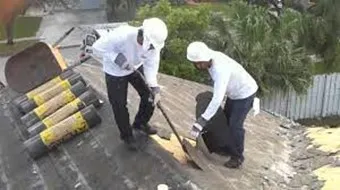
Drying in a roof is done by installing roofing underlayment. If you’re re-roofing, it’s installed after the old roofing material has been removed. Prior to installing any underlayment, make sure the roof is clean and clear of any debris, nails, or staples.
On a new roof, the roofing underlayment will be installed on the wood substrate prior to installation of the metal roofing and flashings.
Installing the roofing underlayment correctly is crucial, especially when leaving the roof exposed. Incorrectly installing the underlayment can lead to leaks, which defeats the purpose of drying in a roof.

Have to Replace your Roof? Things You Should Know Before Replacing Your Roof
- When Your Roof Was Installed or Repaired Last. Does your home have the original roof, or were repairs made within the past few years?
- How Your Roof is Ventilated.
- What Type of Shingles You Have.
- The Fire Rating of Your Roof.
- Pitch, or Slope of Your Roof.
Tips to Maintain Your Roof
- Keep Your Gutters Clean.
- Trim Back Trees and Landscaping.
- Remove Snow From Your Roof.
- Check for Cracked or Missing Shingles. Remove Moss and Mold.
- Look for Leaks in the Attic and Ceiling.
- Ensure Strong Insulation.
- Get a Roof Inspection.

Sorry, the comment form is closed at this time.